Welcome to the fourth installment of Queer Your Tech with Fun, Autostraddle’s nerdy new tech column. Not everything I cover will be queer per se, but it will be about customizing this awesome technology you’ve got. Having it our way, expressing our appy selves just like we do with our identities. Here we can talk about anything from app recommendations to choosing a wireless printer to web sites you have to favorite to any other fun shit we can do with technology.
Header by Rory Midhani

Basically, trackpad shortcuts aren’t just super duper time savers when you’re using a Mac. They’re also an opportunity for me to talk about one-finger, two-finger, three-finger and four-finger gestures with an audience who will get the joke. According to Wikipedia:
“A touchpad (/ˈtʌtʃpæd/) or trackpad (/ˈtrækpæd/) is a pointing device featuring a tactile sensor, a specialized surface that can translate the motion and position of a user’s fingers to a relative position on screen. Touchpads are a common feature of laptop computers, and are also used as a substitute for a mouse where desk space is scarce.”
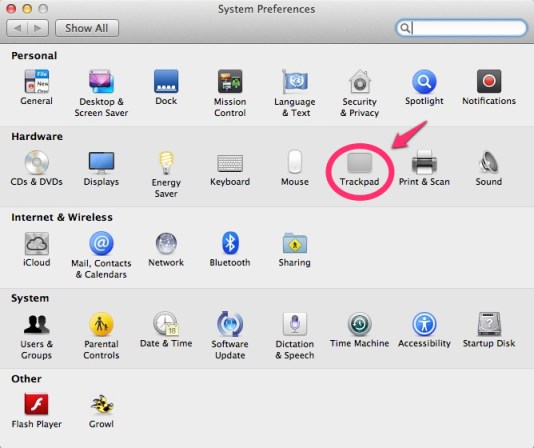
The first thing you have to know about trackpad short cuts is that they can all be both learned and customized through your System Preferences. Head up to the little Apple in the top lefthand corner of your computer. Click on that, and then click System Preferences. You will see the following:
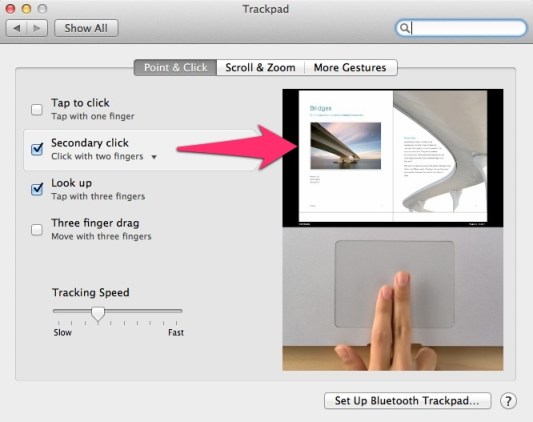
Click on Trackpad. See? I circled it for you. I chose pink because my soul is made out of pink cotton candy. Then you’ll get to the magical land where all the shortcuts live.
Hover your cursor over any one of the options and you’ll see a how-to video right next door. That’s how you learn the basis of each gesture. Also I will tell you about the most common gestures. Don’t get anxious.
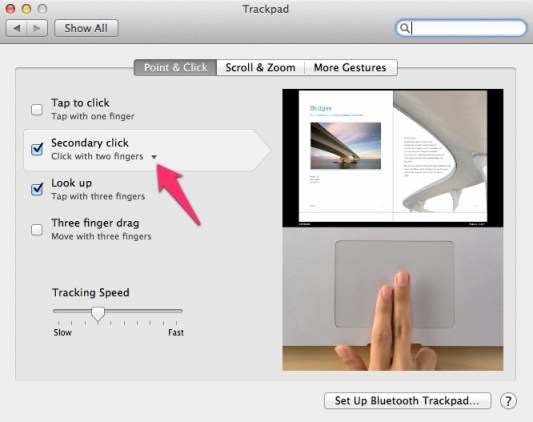
The above is called a disclosure triangle. This means there’s a drop down menu to be had, which means more options. You can customize every gesture that has a disclosure triangle next to it.
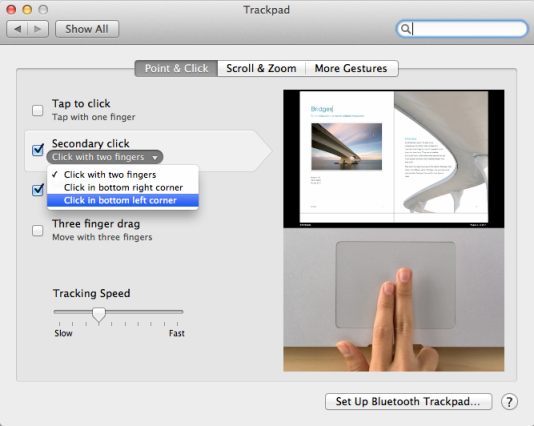
For example, you can change your secondary click from clicking with two fingers to clicking in the bottom right hand corner of the track pad. A secondary click is what PC users generally refer to as a right click and what I like to call a menu click. Basically, it’s the way you bring up the little white menu that we all learned to love back in the days of dial up internet service. System Preferences mean never having to compromise on which way you want your menu click – much like Burger King, you can have it your way.
Here’s a glossary of trackpad shortcuts by amount of fingers they require. The ones marked with an asterisk are customizable. And if you ever forget what does who where now, you can always go back to your system preferences for the helpful how-to videos.
One Finger
Standard navigation. I throw this one in here because I watch people try to move their cursor around with two fingers, or wonder why their cursor isn’t moving when they’ve accidentally rested their thumb on their track pad. Whenever you just want to move your cursor from point A to B, use only one finger.
Tap to click.* Popular with PC users, this way you won’t have to push so hard on the trackpad to click. Instead of throwing your weight behind it until you feel a click like an old-fashioned mouse, simply light your finger on the trackpad like a butterfly landing. You have now tapped to click. This, by default, is turned off.
Two Fingers
Secondary click.* Click with two fingers to bring up a menu that relates to the item on which you are clicking with two fingers. Popular uses including downloading pictures from facebook and clicking on the desktop to change the desktop background.
Zoom. Using your finger and your thumb, pinch in and out to zoom in and out. Don’t click while doing this – brush very lightly on the trackpad instead. This works in many applications, the most popular being Safari and iPhoto.
Rotate. Place your finger and thumb on the trackpad as if you’re going to turn the volume up on your car stereo. Then make that exact same motion. You can rotate photos or PDFs like this. Again, no clicking. Just brushing. Lightly.
Smart zoom. Double tap with two fingers to zoom to where your cursor currently resides. This works in Safari. And again, there is a difference between a tap and a click. That difference is force– don’t put as much force behind a tap.
Swipe between pages.* Using two fingers, quickly swipe in either direction. Try this in Safari – it works like the back and forward buttons in the top lefthand corner work.
Notification center. Mountain Lion only. Using two fingers, swipe from the right edge of the trackpad to the left. Make sure to go start all the way out on the right edge, or the computer may get confused between this gesture and swipe between pages.
Three Fingers
Look up. Hover your cursor over a word on your screen and tap once with three fingers. This will look up the word in the dictionary, thesaurus and even on Wikipedia. Try this over the word trackpad.
Swipe between full screen apps.* This is my favorite one. You can leave your apps full screen (accomplished by click the button on the top righthand corner of each window, the one with two arrows pointing away from each other) and navigate between them to multitask. Lay three fingers on your track pad and swipe left or right. The order in which the applications come up depends on the order that they’re in on your computer. To check that order, use Mission Control (don’t worry, we’ll get to that.)
Mission control.* Swipe up with three fingers. Mission control shows you everything you have open, including the order of full screen apps. Reverse the action to get back out.
Four Fingers
Launchpad. Lay three fingers and your thumb on the track pad. Now pinch together. I always tell people to lift their hand off the trackpad at the end; for whatever reason, this seems to make it easier. Launchpad is where you’ll find all your applications, even the ones not in your dock at the bottom of the screen. Reverse the action to get back.
Show desktop. Place three fingers and your thumb on the track pad, but place them down all bunched together. Now spread them apart. If you’re having trouble, twist your hand a little to the right as you do this. I don’t know why that works, but it does. Now, no matter how many windows you have cluttering up your screen, you can see your desktop. Reverse the action to get your windows back where they were.


I am so bad with computers.. thank you for this!
I just made the transition to Mac after a lifetime of Windows and this is SO helpful. Thank you!
Don’t forget scrolling! Brushing two fingers up moves the page down; brushing down scrolls up.
Y’all probably know that already but I thought I’d put it out there :)
You can change it though so that up is up and down is down…I was so happy when I figured that out.
The four finger ‘show desktop’ gesture can also be used on your right temple to show how your mind has been blown by these shortcuts.
I’ve yet to get fancy with my Mac. Thanks for the intro :)
brb, fingering my macbook.
……you know what I mean.
I upgraded to Lion, and went a bit mad when I lost all my gestures, luckily I got them all back, but this is an awesome guide and reference. its crazy borrowing someone else’s Mac and not having a clue how to use it.
I love about learning how to do new things with my fingers….. er…. Mac.
whoops…excuse the juxtaposed about and learning. my excitement got the better of me.
“If you’re having trouble, twist your hand a little to the right as you do this.”
Be careful not to pop your wrist!
BOOKMARKED
I just started using the newer MBP not that long ago and this is awesome. Especially the one to get back to my desktop. I regularly have like 9 programs open am always hitting command-H to hide them all.
Also awesome:
http://www.danrodney.com/mac/
I just accidentally found a finger shortcut. Hover over text, hold one finger on trackpad, then use two other fingers to drag down and it selects the text… clever aye?
When I was at the apple store getting my desktop set up they told me I could choose between a trackpad or a mouse. They then proceeded to demonstrate all these shortcuts and I totally kept my cool and said “Oh my god, I basically get to be Tony Stark you know in Iron Man 2 when he’s all like whoom!”
I’ve since forgotten half of these so thank you!
I wish Synaptics could do all this in KDE. I’m sure there’s an app somewhere in the repos that’ll let me pimp my trackpad.
Not that I ever really use one (my laptop is pretty much eternally desk-bound), but an easier way to switch between virtual desktops when on the go (because I’ll have to leave my room eventually) would be nice. :)
Maybe I’ll just start walking around with my gamepad and control the cursor with it. Could be interesting. :)
“Place three fingers and your thumb on the XXX, but place them down all bunched together. Now spread them apart. If you’re having trouble, twist your hand a little to the right as you do this. I don’t know why that works, but it does. Now, no matter how many XXX you have, you can see your XXX.”
This is how I imagine early lesbian magazines would have published secret sex articles disguised as other things.